Unity分离贴图alpha通道
Unity分离贴图alpha通道
UI 同学抱怨 iOS 上一些透明贴图压缩后模糊不堪
一些古早的 Android 手机上同样的贴图吃内存超过其他手机数倍,游戏经常闪退
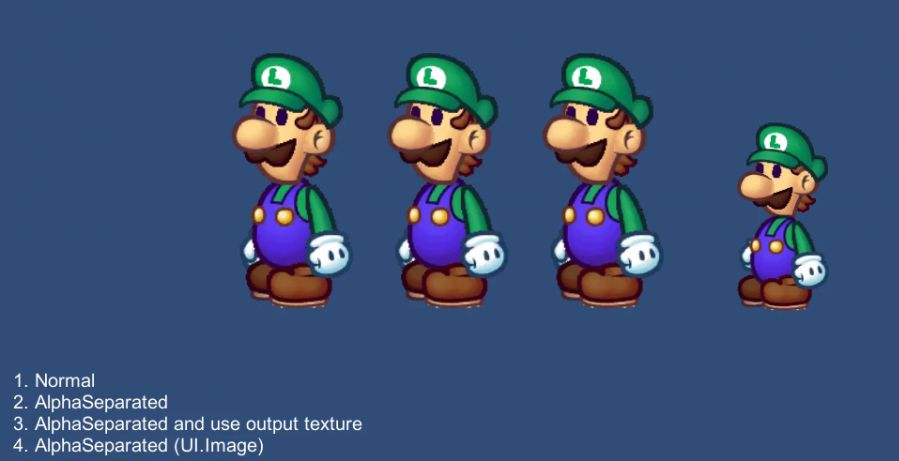
为什么要分离
1. 为什么会出现这些问题
要弄明白这些问题的由来,首先要简单解释一下贴图压缩格式的基础概念。
为了让贴图在手机中运行时占用尽可能少的内存,需要设置贴图的压缩格式,目前 Unity 支持的主要压缩格式有:android 上的 ETC/ETC2,iOS 上的 PVRTC,以及未来可能会使用的 ASTC。这几个压缩格式有自己的特点:
ETC:不支持透明通道,被所有 android 设备支持
ETC2:支持透明通道,Android 设备的 GPU 必须支持 OpenGL es 3.0 才可以使用,对于不支持的设备,会以未压缩的形式存在内存中,占用更多内存
PVRTC:所有苹果设备都可以使用,要求压缩纹理长宽相等,且是 2 的幂次(POT,Power of 2)
ASTC:高质量低内存占用,未来可能普遍使用的压缩格式,现在有一部分机型不支持
一般来说,目前 Unity 的手机游戏 android 上非透明贴图会使用 RGB Compressed ETC 4bits,透明贴图可以使用 RGBA Compressed ETC2 8bit,iOS 非透明贴图使用 RGB Compressed PVRTC 4bits,透明贴图使用 RGBA Compressed PVRTC 4bits。
这里的 bits 概念的意思为:每个像素占用的比特数,举个例子,RGB Compressed PVRTC 4bits 格式的 1024x1024 的贴图,其在内存中占用的大小 = 1024x1024x4 (比特) = 4M (比特) = 0.5M (字节)。
我们可以看到,在 iOS 上,非透明贴图和透明贴图都是 4bpp(4bits per pixel)的,多了透明通道还是一样的大小,自然 4bpp 的透明贴图压缩出来效果就会变差,而实机上看确实也是惨不忍睹。这是第一个问题的答案。
一些古早的 android 机,由于不支持 OpenGL es 3.0,因此 RGBA Compressed ETC2 8bit 的贴图一般会以 RGBA 32bits 的格式存在于内存中,这样内存占用就会达到原来的 4 倍,在老机器低内存的情况下系统杀掉也不足为奇了。这是第二个问题的答案。当然,需要说明的是,现在不支持 OpenGL es 3.0 的机器的市场占有率已经相当低了(低于 1%),大多数情况下可以考虑无视。
更多的贴图压缩格式相关内容可以参考这里:https://zhuanlan.zhihu.com/p/113366420
2. 如何解决问题
要解决上面图片模糊的问题,可以有这些做法:
- 透明贴图不压缩,内存占用 32bpp
- 分离 alpha 通道,内存占用 4bpp+4bpp(或 4bpp+8bpp)
不压缩显然是不可能的,毕竟 32bpp 的内存消耗对于手机来说过大了,尤其对于小内存的 iOS 设备更是如此。所以我们考虑分离 alpha 通道,将非透明部分和透明部分拆成两张图(如下所示)。

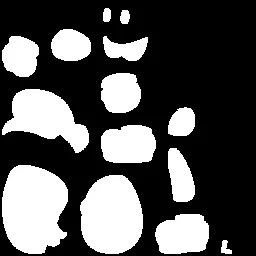
至于其内存占用,一般来说会把非透明部分拆成 RGB Compressed PVRTC 4bits,而透明通道部分可以使 RGB Compressed PVRTC 4bits,使用了 RGB Compressed PVRTC 4bits 格式来压缩透明通道贴图,效果已经完全可以接受了。
如何分离
1. 方案 1
我们很自然而然的会想到,继承 SpriteRenderer/Image 组件去实现运行时替换材质来达到目的。这种方案有一些缺点,对于已经开发到后期的项目来说,要修改所有的组件成本非常高,更不用说在加入版本控制的项目中,修改 prefab 的合并成本也非常高了;另外对于已经使用自定义材质的组件来说也很不方便。
2. 方案 2
直接修改 Sprite 的 RenderData,让其关联的 texture,alphaTexture 等信息直接在打包时被正确打入包内。

这样做的好处就是不需要去修改组件了,只要整个打包流程定制化好以后就能够一劳永逸了。而对于大多数商业项目来说,定制打包流程基本是必须的,所以这个也就不算是什么问题了。
实现细节
首先说明一下,本方案在 2017.4 测试通过,其中打图集是采用已经废弃的 Sprite Packer 的方式,至于 Sprite Atlas 的方式,我没有研究过,但我觉得应该都可以实现,只是可能要改变不少流程。
下面说明一下具体实现,在打包之前大致流程如下:
// 刷新图集缓存
UpdateAtlases(buildTarget);// 找到所有要处理的项
FindAllEntries(buildTarget, m_spriteEntries, m_atlasEntries);// 生成 alpha 纹理
GenerateAlphaTextures(m_atlasEntries);// 保存纹理到文件
SaveTextureAssets(m_atlasEntries);// 刷新资源
AssetDatabase.Refresh();// 从文件中加载 alpha 纹理
ReloadTextures(m_atlasEntries);// 修改所有 sprite 的 Render Data
WriteSpritesRenderData(m_atlasEntries);// 禁用 SpritePacker 准备打包
EditorSettings.spritePackerMode = SpritePackerMode.Disabled;
大致解释一下上面的流程:
- UpdateAtlases:强制刷新图集缓存(需要分离 alpha 通道的图集要修改其压缩格式为去掉 A 通道的)
- FindAllEntries:找到所有的 sprite,检查其 PackingTag,分类整理所有 sprite 和图集的信息
- GenerateAlphaTextures/SaveTextureAssets:根据图集的信息绘制 alpha 通道的纹理并保存文件
- AssetDatabase.Refresh():实践中如果不重新刷新的话,可能导致某个贴图无法找到
- ReloadTextures:从文件加载纹理,作为写入 RenderData 的数据
- WriteSpritesRenderData:最重要的一步,将 texture,alphaTexture 等信息写入 Sprite 的 RenderData
最后,在打包前,禁用 SpritePacker,避免其在打包时重写打了图集并覆写了 Sprite 的 RenderData
其中,关于生成 Alpha 通道贴图,需要注意的是使用图集中的散图位置等信息,将压缩前的顶点信息直接渲染到贴图上,这样透明通道贴图就不会受到压缩的影响。
// 临时渲染贴图
var rt = RenderTexture.GetTemporary(texWidth, texHeight,
0, RenderTextureFormat.ARGB32);
Graphics.SetRenderTarget(rt);
GL.Clear(true, true, Color.clear);
GL.PushMatrix();
GL.LoadOrtho();foreach (var spriteEntry in atlasEntry.SpriteEntries)
{
var sprite = spriteEntry.Sprite;
var uvs = spriteEntry.Uvs;
var atlasUvs = spriteEntry.AtlasUvs;// 将压缩前 sprite 的顶点信息渲染到临时贴图上
mat.mainTexture = spriteEntry.Texture;
mat.SetPass(0);
GL.Begin(GL.TRIANGLES);
var triangles = sprite.triangles;
foreach (var index in triangles)
{
GL.TexCoord(uvs[index]);
GL.Vertex(atlasUvs[index]);
}GL.End();
}GL.PopMatrix();
// 最终的 alpha 贴图
var finalTex = new Texture2D(texWidth, texHeight, TextureFormat.RGBA32, false);
finalTex.ReadPixels(new Rect(0, 0, texWidth, texHeight), 0, 0);// 修改颜色
var colors = finalTex.GetPixels32();
var count = colors.Length;
var newColors = new Color32[count];
for (var i = 0; i < count; ++i)
{
var a = colors.a;
newColors = new Color32(a, a, a, 255);
}finalTex.SetPixels32(newColors);
finalTex.Apply();RenderTexture.ReleaseTemporary(rt);
在将透明通道贴图写文件有一点需要注意的是:由于可能打的图集会产生多个 Page,这些 Page 的贴图名都是相同的,如果直接保存可能造成错误覆盖,所以需要使用一个值来区分不同 Page,这里我们使用了 Texture 的 hash code。
// 支持多 page 图集
var hashCode = atlasEntry.Texture.GetHashCode();// 导出 alpha 纹理
if (atlasEntry.NeedSeparateAlpha)
{
var fileName = atlasEntry.Name + “_” + hashCode + “_alpha.png”;
var filePath = Path.Combine(path, fileName);
File.WriteAllBytes(filePath, atlasEntry.AlphaTexture.EncodeToPNG());
atlasEntry.AlphaTextureAssetPath = Path.Combine(assetPath, fileName);
}
接下来再说明一下最重要的写 SpriteRenderData 部分。
var spr = spriteEntry.Sprite;
var so = new SerializedObject(spr);// 获取散图属性
var rect = so.FindProperty(“m_Rect”).rectValue;
var pivot = so.FindProperty(“m_Pivot”).vector2Value;
var pixelsToUnits = so.FindProperty(“m_PixelsToUnits”).floatValue;
var tightRect = so.FindProperty(“m_RD.textureRect”).rectValue;
var originSettingsRaw = so.FindProperty(“m_RD.settingsRaw”).intValue;// 散图(tight)在散图(full rect)中的位置和宽高
var tightOffset = new Vector2(tightRect.x, tightRect.y);
var tightWidth = tightRect.width;
var tightHeight = tightRect.height;// 计算散图(full rect)在图集中的 rect 和 offset
var fullRectInAtlas = GetTextureFullRectInAtlas(atlasTexture,
spriteEntry.Uvs, spriteEntry.AtlasUvs);
var fullRectOffsetInAtlas = new Vector2(fullRectInAtlas.x, fullRectInAtlas.y);// 计算散图(tight)在图集中的 rect
var tightRectInAtlas = new Rect(fullRectInAtlas.x + tightOffset.x,
fullRectInAtlas.y + tightOffset.y, tightWidth, tightHeight);// 计算 uvTransform
// x: Pixels To Unit X
// y: 中心点在图集中的位置 X
// z: Pixels To Unit Y
// w: 中心点在图集中的位置 Y
var uvTransform = new Vector4(
pixelsToUnits,
rect.width * pivot.x + fullRectOffsetInAtlas.x,
pixelsToUnits,
rect.height * pivot.y + fullRectOffsetInAtlas.y);// 计算 settings
// 0 位:packed。1 表示 packed,0 表示不 packed
// 1 位:SpritePackingMode。0 表示 tight,1 表示 rectangle
// 2-5 位:SpritePackingRotation。0 表示不旋转,1 表示水平翻转,2 表示竖直翻转,3 表示 180 度旋转,4 表示 90 度旋转
// 6 位:SpriteMeshType。0 表示 full rect,1 表示 tight
// 67 = SpriteMeshType(tight) + SpritePackingMode(rectangle) + packed
var settingsRaw = 67;// 写入 RenderData
so.FindProperty(“m_RD.texture”).objectReferenceValue = atlasTexture;
so.FindProperty(“m_RD.alphaTexture”).objectReferenceValue = alphaTexture;
so.FindProperty(“m_RD.textureRect”).rectValue = tightRectInAtlas;
so.FindProperty(“m_RD.textureRectOffset”).vector2Value = tightOffset;
so.FindProperty(“m_RD.atlasRectOffset”).vector2Value = fullRectOffsetInAtlas;
so.FindProperty(“m_RD.settingsRaw”).intValue = settingsRaw;
so.FindProperty(“m_RD.uvTransform”).vector4Value = uvTransform;
so.ApplyModifiedProperties();// 备份原数据,用于恢复
spriteEntry.OriginTextureRect = tightRect;
spriteEntry.OriginSettingsRaw = originSettingsRaw;
需要修改的部分的含义,这里面的注释已经写的很清楚了,简单看一下能够大致理解。其中还有几个概念需要说明一下:
在 Sprite 的导入设置中,会被要求设置 MeshType,默认的是 Tight,其效果会基于 alpha 尽可能多的裁剪像素,而 Full Rect 则表示会使用和图片纹理大小一样的矩形。

这两个选项在达成图集时,如果你的散图周围的 alpha 部分比较多,使用 full rect 时就会看到图片分的很开,而使用 tight,表现出来的样子就会很紧凑,效果为下面几张图:
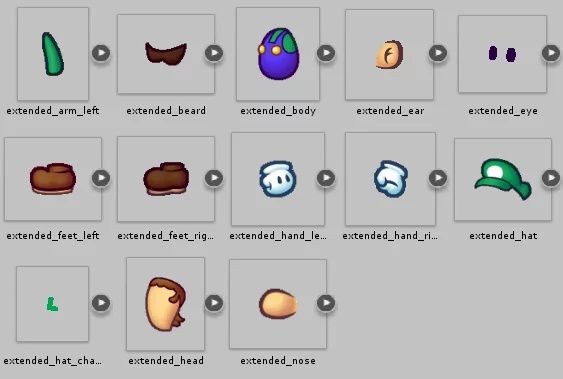
上面这个散图原图,可以看到周围透明部分较多

上面这个是使用 Tight 的 mesh type 打成的图集,可以看到中间的间隔较少
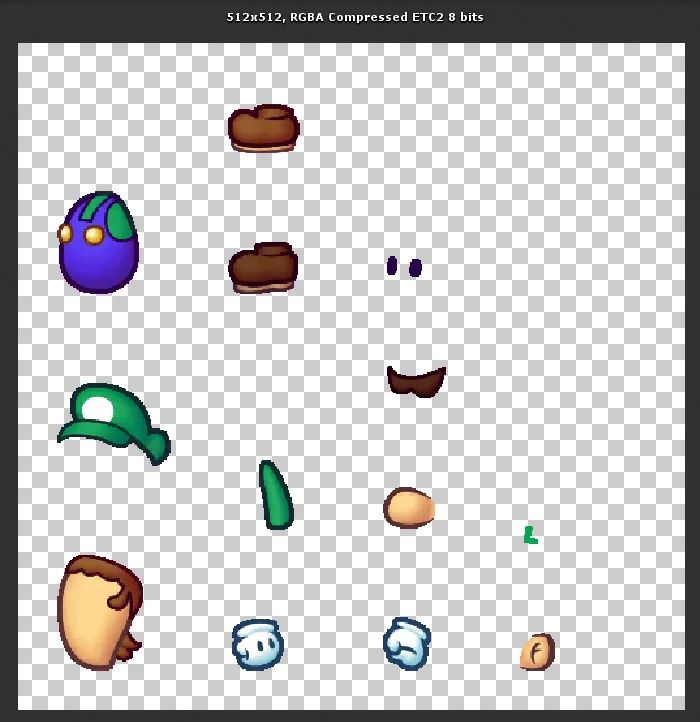
上面这个是使用 full rect 的 mesh type 打成的图集,可以看到中间的间隔较大。
一般我们会使用 Tight,那么我在上面代码中就需要对 tight 相关的一些数值做计算,具体如何计算直接看代码吗,应该不难理解。
其中还有一个获取计算散图(full rect)在图集中的 rect 的方法 GetTextureFullRectInAtlas,代码如下:
private static Rect GetTextureFullRectInAtlas(Texture2D atlasTexture, Vector2[] uvs, Vector2[] atlasUvs)
{
var textureRect = new Rect();// 找到某一个 x/y 都不相等的点
var index = 0;
var count = uvs.Length;
for (var i = 1; i < count; i++)
{
if (Math.Abs(uvs.x - uvs[0].x) > 1E-06 &&
Math.Abs(uvs.y - uvs[0].y) > 1E-06)
{
index = i;
break;
}
}// 计算散图在大图中的 texture rect
var atlasWidth = atlasTexture.width;
var atlasHeight = atlasTexture.height;
textureRect.width = (atlasUvs[0].x - atlasUvs[index].x) / (uvs[0].x - uvs[index].x) * atlasWidth;
textureRect.height = (atlasUvs[0].y - atlasUvs[index].y) / (uvs[0].y - uvs[index].y) * atlasHeight;
textureRect.x = atlasUvs[0].x * atlasWidth - textureRect.width * uvs[0].x;
textureRect.y = atlasUvs[0].y * atlasHeight - textureRect.height * uvs[0].y;return textureRect;
}
最后,需要在自定义打图集规则,并在判断需要分离 alpha 通道的贴图,修改其对应压缩格式,如 RGBA ETC2 改 RGB ETC,RGBA PVRTC 改 RGB PVRTC。这样做是为了打图集生成一份不透明贴图的原图。大致代码如下:
// 需要分离 alpha 通道的情况
if (TextureUtility.IsTransparent(settings.format))
{
settings.format = TextureUtility.TransparentToNoTransparentFormat(settings.format);
}
至于如何自定义打图集的规则,可以参考官方文档:https://docs.unity3d.com/Manual/SpritePacker.html
一些补充
1. 在手机上 UI.Image 显示的贴图为丢失材质的样子
原因在于 Image 组件使用这套方案时,使用了一个内置的 shader:DefaultETC1,需要在 Editor -> Project Settings -> Graphics 中将其加入到 Always Included Shaders 中去。
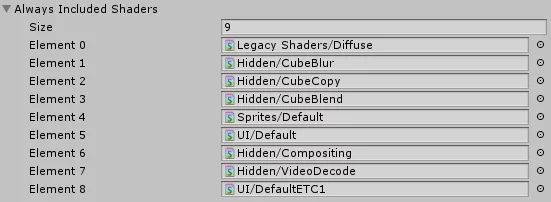
2. 分离 alpha 通道的贴图的 sprite 资源打入包内的形式
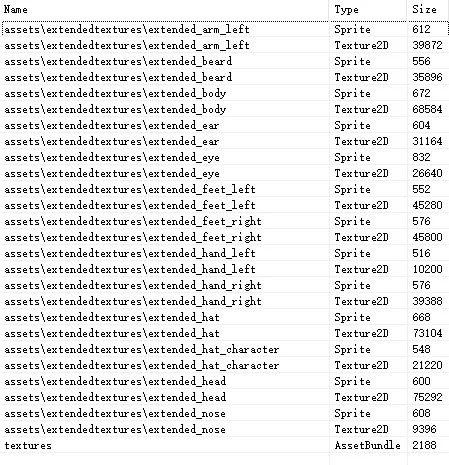
通过 AssetStudio 工具看到,下图是没有分离 alpha 通道的散图的情况,可以看到每一个 Sprite 引用了一张 Texture2D
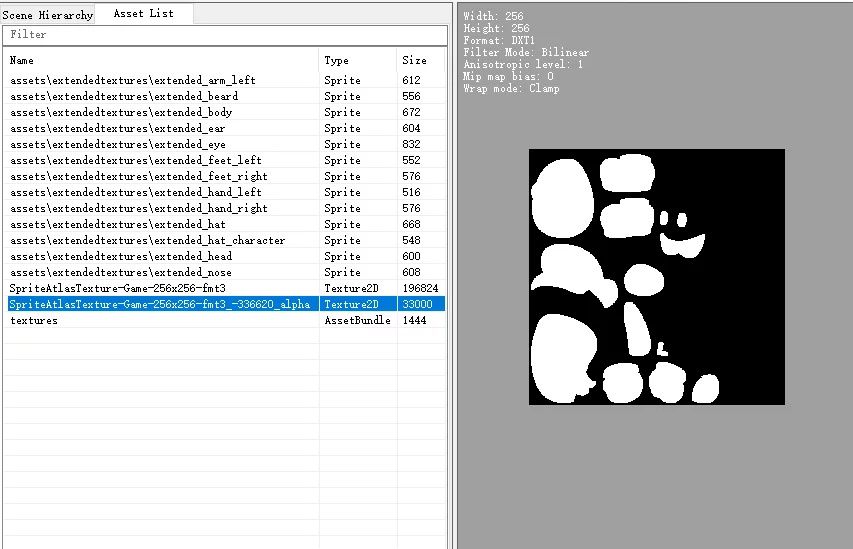
下图是分离了 Alpha 通道的图集的情况,可以看到,这个 AssetBundle 包中只有数个 Sprite,以及 2 张 Texture2D(非透明贴图和透明通道贴图)。
3. 如何知道需要修改 Sprite 的哪些 Render Data
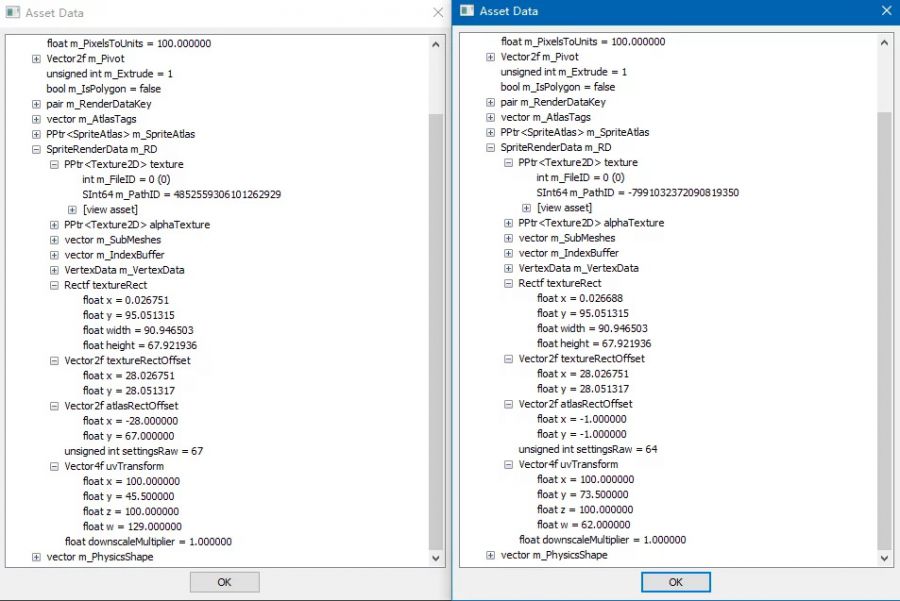
在实践尝试的过程中,通过 UABE 工具来比较不分离 alpha 通道和分离 alpha 通道的两种情况下 Sprite 内的 Render Data 的不同,来确定需要修改哪些数据来达到目的。
从下图可以看出(左边是正常图集的数据,右边是我尝试模拟写入 RenderData 的错误数据),m_RD 中的 texture,alphaTexture,textureRect,textureRectOffset,settingsRaw,uvTransform 这些字段都需要修改。因为我无法接触到源码,所以其中一些值的算法则是通过分析猜测验证得出的。
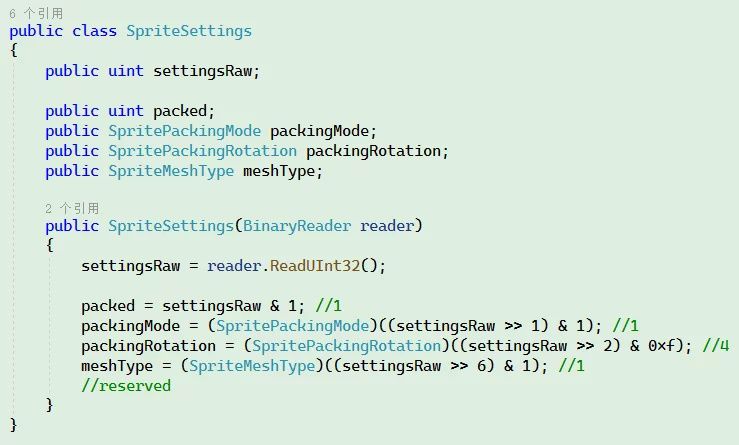
4. m_RD.settingsRaw 的值的意义是什么
从 AssetStudio 源码中可以找到 settingsRaw 的一部分定义:
- 0 位:packed。1 表示 packed,0 表示不 packed
- 1 位:SpritePackingMode。0 表示 tight,1 表示 rectangle
- 2-5 位:SpritePackingRotation。0 表示不旋转,1 表示水平翻转,2 表示竖直翻转,3 表示 180 度旋转,4 表示 90 度旋转
- 6 位:SpriteMeshType。0 表示 full rect,1 表示 tight
其中正常生成的图集的值 67,表示 SpriteMeshType(tight) + SpritePackingMode(rectangle) + packed。
5. 在 Unity 2017 测试通过,其他版本可以通过吗
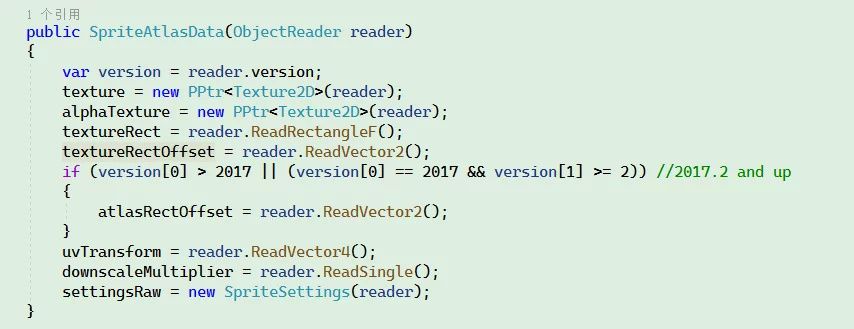
并不确定。通过查看 AssetStudio 源码,可以看到序列化后有许多跟 Unity 版本相关的不同处理(下图),如果在不同版本出现问题,可以通过上面对比打好的 AssetBundle 包的 Sprite 的 RenderData 的方式来排查是否需要填写其他数据。
延伸思考
如果我们把一开始刷新图集缓存的操作更换成 TexturePacker 的话,是否可以使用 TexturePacker 中的一些特性来为图集做优化和定制呢?这是可能的,但是这也不是简单就能做到的东西,还是很繁琐的,不过的确是一个不错的思路,有需要的同学可以研究一下。
参考资料
IOS 下拆分 Unity 图集的透明通道(不用 TP):
https://zhuanlan.zhihu.com/p/32674470
[2018.1] Unity 贴图压缩格式设置:****https://zhuanlan.zhihu.com/p/113366420
(Legacy) Sprite Packer:
https://docs.unity3d.com/Manual/SpritePacker.html
文中提到的工具:
AssetStudio,一个可以轻松查看 AssetBundle 内容的工具:
https://github.com/Perfare/AssetStudio
UABE,可以解包/打包 AssetBundle,并查看其中详细数据的工具:
https://github.com/DerPopo/UABE